If it seems like every other day there is a new report of another person becoming infected with the coronavirus, you’re not alone in your concern. Whether you are worried about getting sick or want to be prepared in case of an outbreak in your area, it’s important to understand the different types of masks available and what their uses are. In this post, we’ll breakdown the N95 mask and help you decide if it is right for you and your family. Stay safe!
What are the different types of face masks and their benefits/purpose
There are four main types of face masks: medical masks, dust masks, anti-pollution masks, and N95 respirators. Each type of mask has its own unique purpose and should be used accordingly. Here’s a quick breakdown of each type:
Medical Masks: also known as surgical masks, these are designed to be used by healthcare professionals in order to protect them from airborne bacteria and viruses.
Dust Masks: these are typically used when working in dusty or dirty environments, such as construction sites or factories. They are designed to filter out large particles, such as dust or sand.
Anti-Pollution Masks: these are designed to filter out small particles, such as smoke or pollution, and can be used in both urban and rural areas.
N95 Respirators: these are the most heavy-duty of all the mask types, and are designed to filter out 95% of airborne particles. They are typically used by healthcare professionals working in high-risk environments, such as hospitals.
How to choose the right face mask for you and your family?
The environment in which you’ll be using the mask. If you’ll be working in a dusty or dirty environment, a dust mask or anti-pollution mask is a good choice. If you’re worried about contracting or spreading a virus, a medical mask is the best option.
The size of the particles you’ll be dealing with. Dust masks and anti-pollution masks can filter out large particles, but they won’t be as effective against small particles, such as smoke or pollution. N95 respirators are designed to filter out small particles, and are the most effective type of mask available.
The fit of the mask. It’s important that the mask fits snugly against your face in order to be effective. Most masks will have a nose clip that can be adjusted for a better fit, and some masks also have adjustable straps for a more customized fit.
Choosing the right face mask for you and your family doesn’t have to be complicated. Just consider the environment in which you’ll be using the mask, the size of the particles you’ll be dealing with, and the fit of the mask. With these factors in mind, you can choose the best face mask for your needs.
Tips on how to use a Kimberly-Clark N95 duckbill mask correctly for protection against BA.5 variant
Masks are only effective if worn correctly, so it’s important to understand how to wear them. Here are a few tips:
Wash your hands thoroughly with soap and water before putting on your mask.
Make sure the mask covers your nose and mouth, and adjust the nose clip for a snug fit.
Avoid touching the mask while wearing it, and if you do, wash your hands immediately.
Remove the mask by taking hold of the ear loops or ties, and avoid touching the front of the mask as it may be contaminated.
Wash your hands again after removing the mask.
Following these tips will help ensure that your mask is effective and will help you stay safe.
Are you struggling with overlapping toes? Do toe separators work for overlapping toes? This is a question that we receive often from our readers, so we decided to do some research and put together this ultimate guide. Keep reading to learn everything you need to know about best toe separators for overlapping toes and what treatment options are available. We also have some tips on how to prevent overlap from occurring in the first place. Let’s get started!
What are toe separators and how do they work?
Toe separators are devices that are placed between the toes to help relieve pain and discomfort. They work by providing a physical barrier between the toes, which prevents them from rubbing against each other. This can help to reduce inflammation and pain in the toes. In addition, toe separators can also help to realign the toes into their natural position. This can be beneficial for both overlapping and non-overlapping toes.
There are a variety of toe separators on the market, made from different materials including gel, foam, and plastic. Some toe separators are even made from medical-grade silicone. Toe separators come in a variety of sizes to accommodate different foot shapes and sizes. They can be purchased online or at most pharmacies and medical supply stores.
Are toe separators effective for overlapping toes?
Toe separators are often recommended as a treatment for overlapping toes. There is some evidence to suggest that they can be helpful in relieving pain and discomfort associated with this condition. In one study, gel toe separators were found to be effective in reducing pain and improving function in people with overlapping toes. However, more research is needed to confirm these findings.
If you’re considering using toe separators for overlapping toes, it’s important to consult with a doctor or podiatrist first. They can help you select the right size and type of toe separator for your condition. They can also provide guidance on how to use them properly.
What are the other treatment options for overlapping toes?
In addition to toe separators, there are a number of other treatment options for overlapping toes. These include:
– Footwear: Wearing shoes that have a wide toe box can help to reduce pain and discomfort associated with overlapping toes. Avoiding high heels and other tight-fitting shoes can also be helpful.
– Orthotics: Custom orthotics or shoe inserts can help to realign the toes into their natural position. This can provide relief from pain and improve function.
– Surgery: In some cases, surgery may be necessary to correct overlapping toes. This is typically only recommended if other treatment options have failed.
If you’re struggling with overlapping toes, don’t despair. There are a number of effective treatment options available. Talk to your doctor or podiatrist about which option may be right for you. With the proper treatment, you can enjoy pain-free walks and runs once again.
How to use toe separators correctly for overlapping toes?
If you’re using toe separators for overlapping toes, it’s important to use them correctly. Here are some tips:
– Place the toe separator between the affected toes. Make sure that it’s positioned in the middle of the space between the toes.
– Gently press the separator into place. You should feel a moderate amount of pressure. The separator should not be so tight that it’s uncomfortable.
– Leave the separator in place for 30 minutes to 1 hour. You can do this several times per day, as needed.
– Remove the separator before walking or running. Doing this can help to prevent injury.
– Consult with a doctor or podiatrist if you have any concerns about using toe separators.
Following these tips can help you use toe separators correctly and effectively for overlapping toes.
How can I prevent overlapping toes?
There are a few things you can do to help prevent overlapping toes, including:
– Wear shoes that fit properly: Make sure your shoes have a wide toe box and aren’t too tight. Avoid high heels and other tight-fitting shoes.
– Stretch your toes: Try some toe stretches and exercises to keep your toes flexible.
– Strengthen your feet: Doing foot exercises can help to strengthen the muscles and tendons around the toes. This can help to prevent deformities such as overlapping toes.
Are you looking for the best lawn mower for steep banks? If so, you’ve come to the right place. In this blog post, we will discuss some of the best lawn mowers for steep banks on the market today. We will also provide a buyer’s guide to help you choose the right lawn mower for your needs. So, whether you are looking for a gas-powered or electric lawn mower, we have got you covered. Let’s get started!
Types of lawn mowers for steep banks:
1. Gas-powered lawn mowers: These are some of the most powerful lawn mowers on the market. They are great for large yards with thick grass. However, they can be difficult to maneuver on steep banks.
2. Electric lawn mowers: These are becoming more popular because they are easier to use and maintain than gas-powered mowers. They are also more environmentally friendly. However, they may not be powerful enough for large yards with thick grass.
3. Reel lawn mowers: These are the traditional type of lawn mowers. They are great for small yards with thin grass. However, they can be difficult to push on steep banks.
4. Robotic lawn mowers: These are perfect for people who want to avoid manual labor but still have a well-manicured yard. However, they can be expensive and require regular maintenance.
5. Handheld lawn mowers: If you are looking for something lightweight and portable, this is the type of lawn mower for you. However, they are not ideal for large yards or steep banks.
What to look for when buying a lawn mower for steep banks?
When buying a lawn mower for steep banks, there are several things you should keep in mind. First, consider the type of lawn mower you need. As we mentioned above, there are gas-powered, electric, reel, robotic, and handheld lawn mowers on the market. So, be sure to choose the right type of lawn mower based on your individual needs and preferences.
Second, consider the power and size of the lawn mower. If you have a large yard with thick grass, you will likely need a more powerful lawn mower with a larger cutting deck. On the other hand, if you have a smaller yard or want to save money on electricity, you may want to opt for a more compact and less powerful lawn mower.
Finally, be sure to consider the price and maintenance requirements of different lawn mowers. Some lawn mowers are more expensive or require more regular maintenance than others. So, it is important to do your research in order to find the best option for your budget and needs. Overall, when buying a lawn mower for steep banks, it is important to carefully consider your individual needs and preferences in order to find the right option for you.
Following are 10 best lawn mowers for steep banks on the market today:
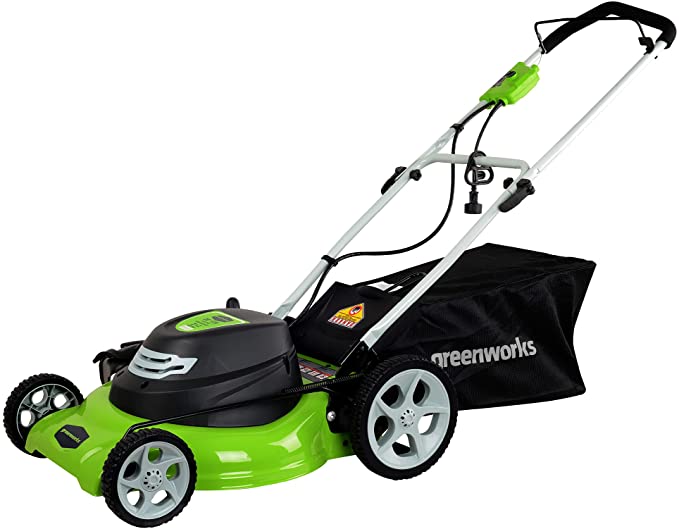
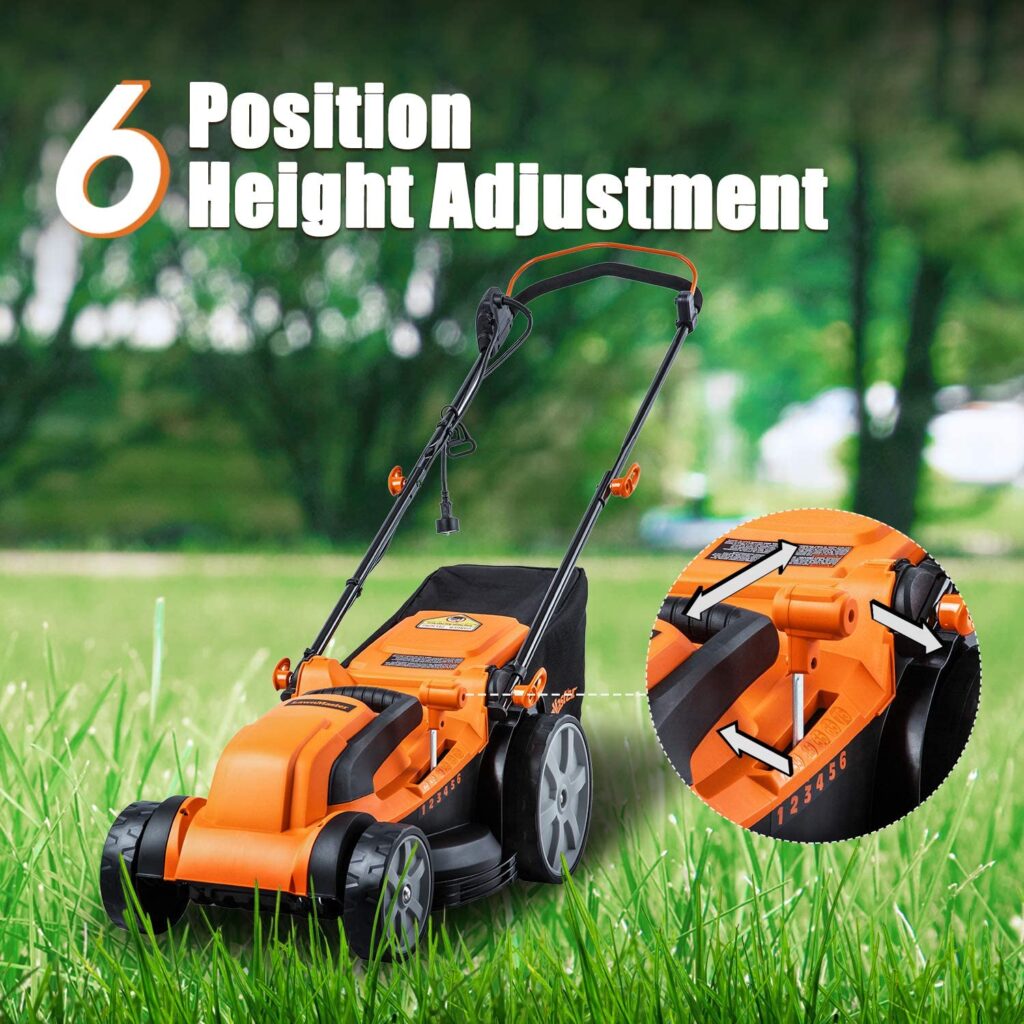
The Greenworks 12 Amp 20-Inch 3-in-1 Electric Corded Lawn Mower is an extremely versatile tool designed to help keep your lawn looking neat and tidy. Whether you are mowing high or low grass, this powerful electric mower makes it easy to achieve beautifully smooth results every time. The three different cutting settings also make it possible for you to customize the level of cut depending on your needs. And with its easy push-button start, this mower is simple and convenient to use as well. Overall, if you’re looking for a high-quality lawn mower that gets the job done quickly and easily, the Greenworks 12 Amp 20-Inch 3-in-1 Electric Corded Lawn Mower is your perfect choice!
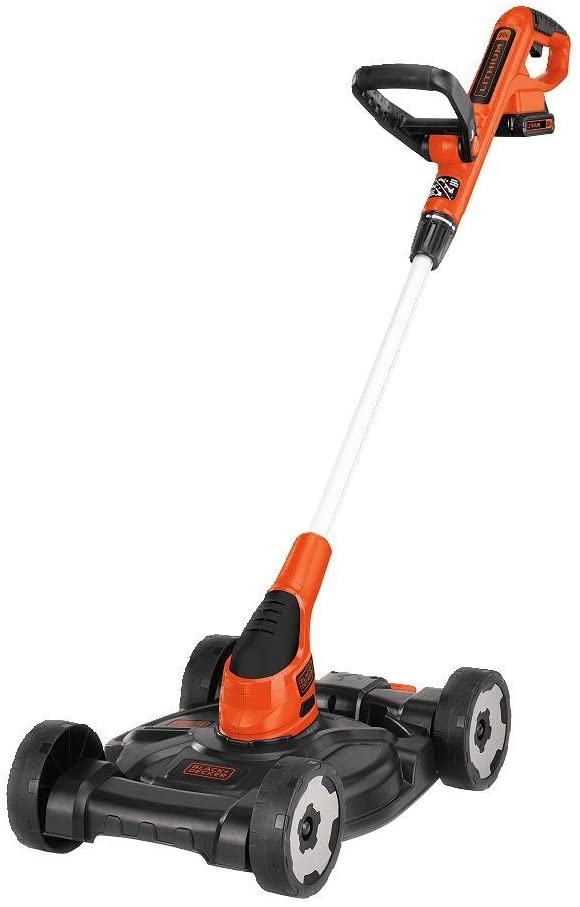
The BLACK+DECKER 3-in-1 Lawn Mower, String Trimmer and Edger is a versatile and convenient tool that will make yard work a breeze. The mower features a 12-inch cutting deck that is perfect for small to medium-sized lawns. The string trimmer is ideal for edging and trimming around fences, flower beds, and walkways. And the edger can be used to create clean, defined lines along sidewalks and driveways. The three-in-one design makes it easy to switch between tasks, and the cordless design means there are no cords to get in the way. With its powerful motor and durable construction, the BLACK+DECKER 3-in-1 Lawn Mower, String Trimmer and Edger is a must-have for any home gardener or landscaper.
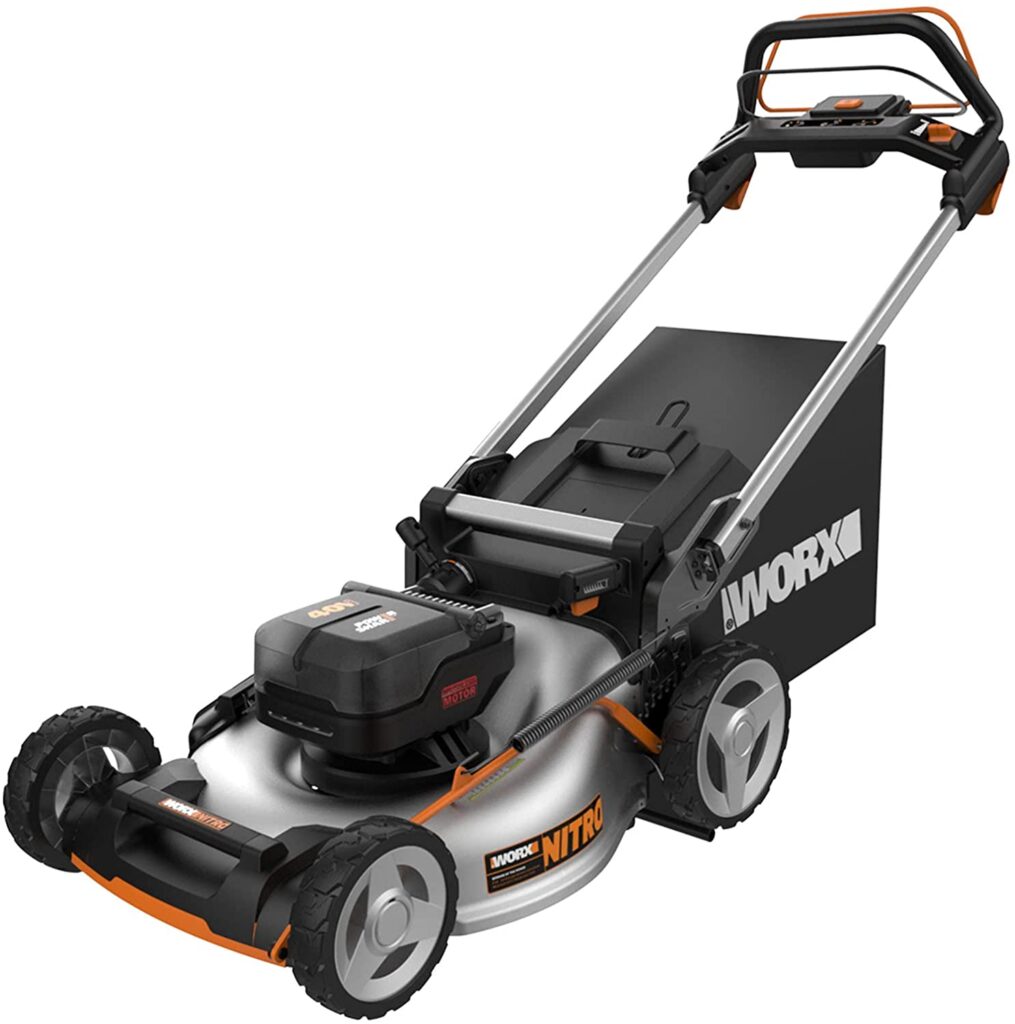
3. WORX Nitro WG753 40V Power Share PRO 21″ Cordless Self-Propelled Lawn Mower (Batteries & Charger Included)
WORX Nitro WG753 40V Power Share PRO 21 inch Cordless Self-Propelled Lawn Mower (Batteries & Charger Included)
If you’re lucky enough to have a home on a hill or bank, you know that mowing the lawn can be a challenge. Traditional push mowers can be difficult to maneuver on uneven terrain, and ride-on mowers can be dangerous if they tip over. The WORX Nitro WG753 is the perfect solution for homeowners with hilly yards. This self-propelled mower is equipped with powerful 40V batteries that give it enough power to tackle even the thickest grass. The large 21″ cutting deck also makes it easy to mow a wide path in one pass. Plus, the WORX Nitro is designed with safety in mind. It features a low center of gravity that makes it unlikely to tip over, and it comes with a safety key that prevents accidental starts. With its combination of power, durability, and safety features, the WORX Nitro is the best choice for homeowners with steep banks or hills in their yard.
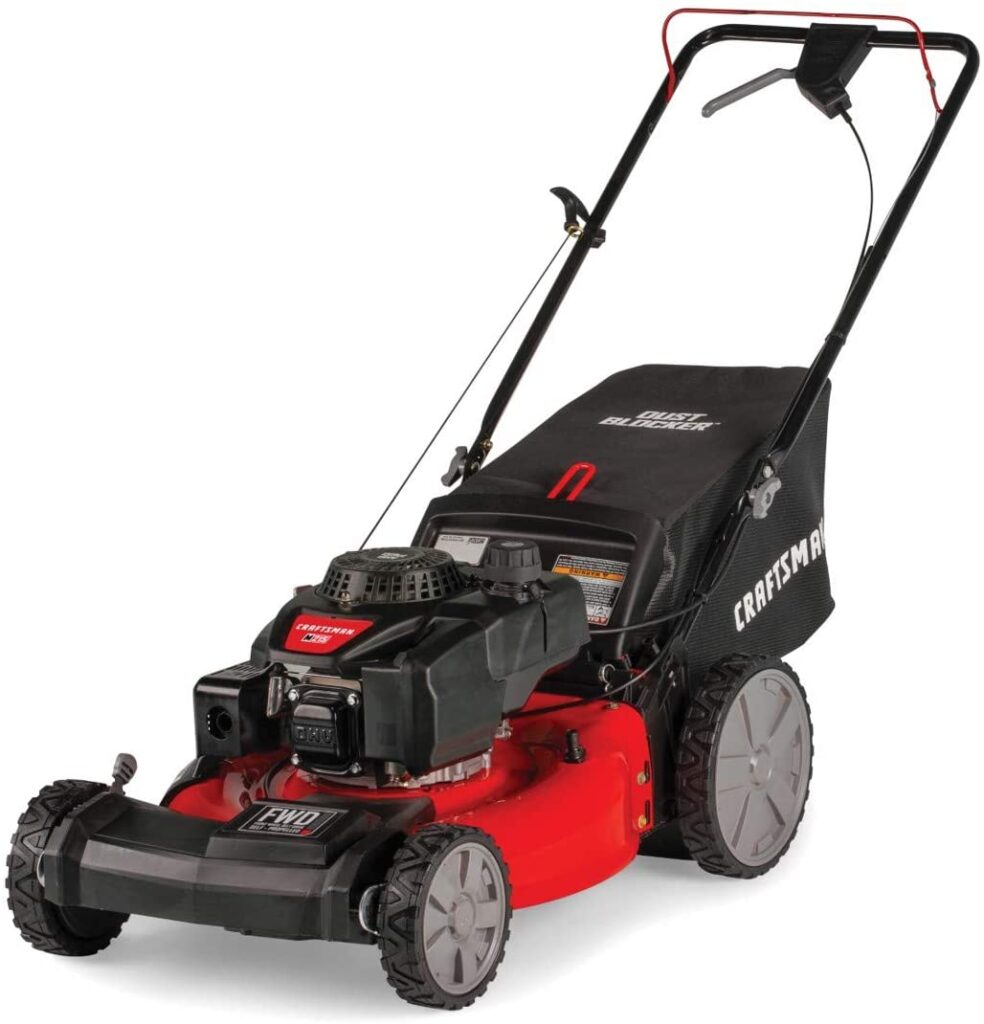
4. Craftsman M215 159cc 21-Inch 3-in-1 High-Wheeled FWD Self-Propelled Gas Powered Lawn Mower with Bagger
Craftsman M215 159cc 21-Inch 3-in-1 High-Wheeled FWD Self-Propelled Gas Powered Lawn Mower with Bagger
When it comes to choosing a lawn mower for steep banks, there are several important factors to consider. First and foremost, you will need to find a mower with powerful and responsive engines that can easily handle the inclines and uneven terrain of your yard. Additionally, the deck height should be adjustable so that you can cut the grass at different heights depending on the slope of your lawn. Finally, for safety purposes, you may want to opt for a mower with large wheels that can easily navigate through tough conditions without constant tipping over. In my opinion, one of the best lawn mowers for steep banks is the Craftsman M215. With a powerful 159cc engine and three different cutting modes, this mower is ideal for tackling even the toughest slopes and uneven ground. So if you’re looking for an effective tool to help keep your landscape in top shape without any headaches or hassle, then I would definitely recommend checking out this high-wheeled self-propelled gas powered model from Craftsman.
5. LawnMaster MEB1216K Electric Lawn Mower 16-Inch 12AMP
LawnMaster MEB1216K Electric Lawn Mower 16-Inch 12AMP
For those of us who live in hilly or otherwise challenging terrain, a good lawn mower is essential. And while there are a number of great options on the market, the LawnMaster MEB1216K Electric Lawn Mower 16-Inch 12AMP is our top pick for the best lawn mower for steep banks. This powerful little machine can handle up to a 16-inch slope, making it ideal for hilly yards. It also features a 12 amp motor that provides plenty of power for even the most stubborn grass. In addition, the LawnMaster MEB1216K comes with a number of convenient features, including an adjustable handlebar and a detachable grass bag. So if you’re looking for a sturdy, reliable lawn mower that can handle even the most challenging terrain, the LawnMaster MEB1216K is the perfect choice.
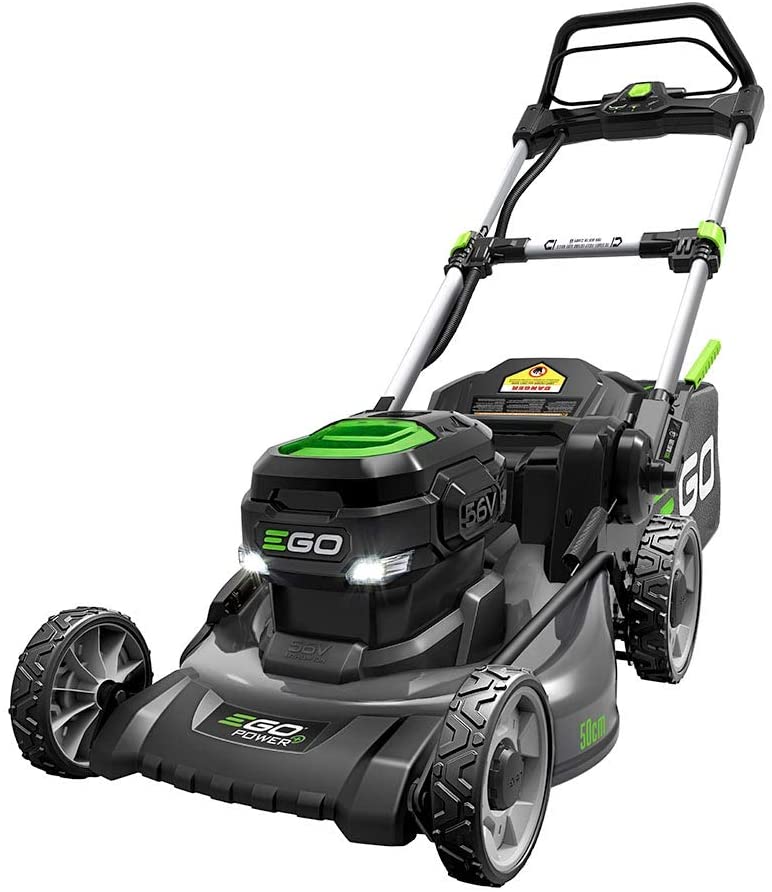
6. EGO Power+ LM2021 20-Inch 56-Volt Lithium-ion Cordless Battery Walk Behind Push Lawn Mower with Steel Deck
EGO Power+ LM2021 20-Inch 56-Volt Lithium-ion Cordless Battery Walk Behind Push Lawn Mower with Steel Deck
If you’re lucky enough to have a garden with a bit of a slope, then you know that mowing the lawn can be quite a challenge. Traditional push mowers can be difficult to maneuver on uneven terrain, and riding mowers can be dangerous if they tip over. That’s why it’s important to choose the right lawn mower for the job. The EGO Power+ LM2021 is specifically designed for use on steep banks. It has a 20-inch cutting width and is powered by a 56-volt lithium-ion battery, so you’ll be able to mow for up to 45 minutes on a single charge. The steel deck is durable and rust-resistant, and the large wheels make it easy to maneuver over rough terrain. Best of all, the EGO Power+ LM2021 comes with a 5-year limited warranty, so you can be confident that your investment will last.
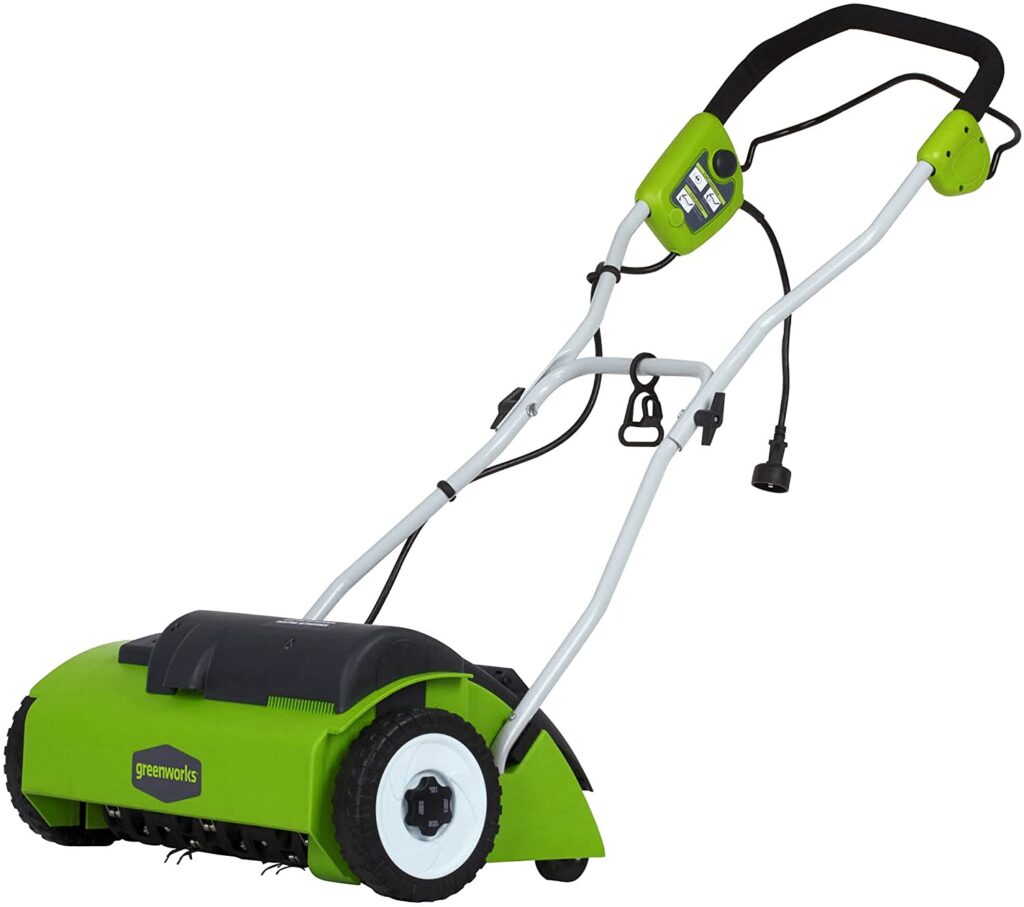
When it comes to maintaining a beautiful, perfectly manicured lawn, having the right tools is essential. For areas with steep banks or uneven terrain, a high-quality lawn mower is key. The Greenworks 14-Inch 10 Amp Corded Dethatcher 27022 is one of the best options available for tackling challenging slopes and uneven ground. With its powerful dual-lever deck height adjusters and easy handle controls, this dethatcher combines power and convenience to give you quick and efficient results every time. So if you’re looking for a tool that can tackle even the most daunting landscaping challenges, look no further than the Greenworks 14-Inch 10 Amp Corded Dethatcher 27022. Its superior performance and versatility are sure to make it your go-to choice for all your grass trimming needs!
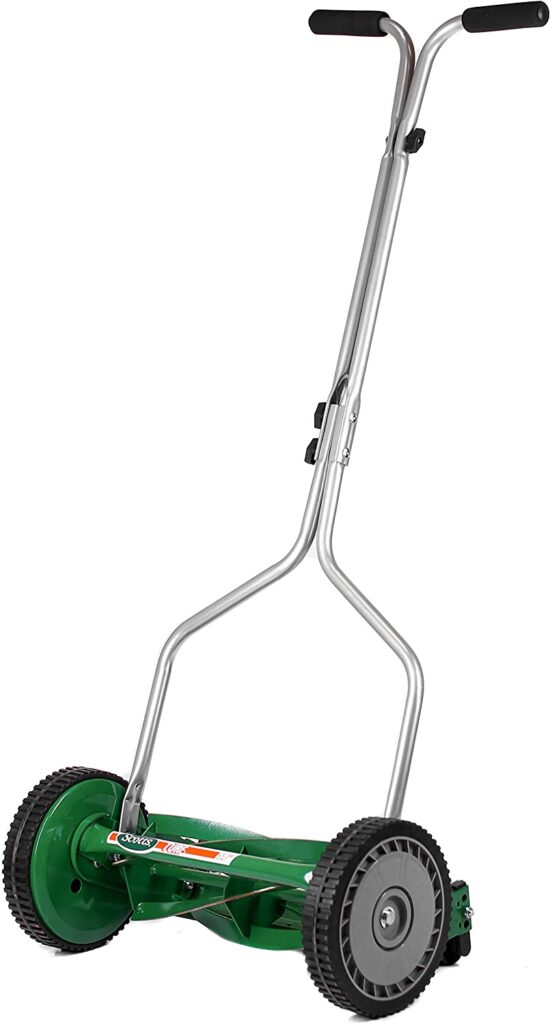
For those with hilly lawns, a standard push mower isn’t always up to the task. That’s where the Scotts Outdoor Power Tools 304-14S comes in. This 14-inch reel mower is specifically designed for use on steep banks and hillsides, and it comes with a number of features that make it ideal for the job. First, the large 14-inch cutting width ensures that you can cover a lot of ground quickly. Second, the five-blade cutting system provides a clean, even cut, regardless of the terrain. And finally, the uniquely designed wheels allow for easy maneuverability, even on the most challenging slopes. Whether you’re mowing your lawn or tackling a particularly difficult section of hillside, the Scotts Outdoor Power Tools 304-14S is up to the task.
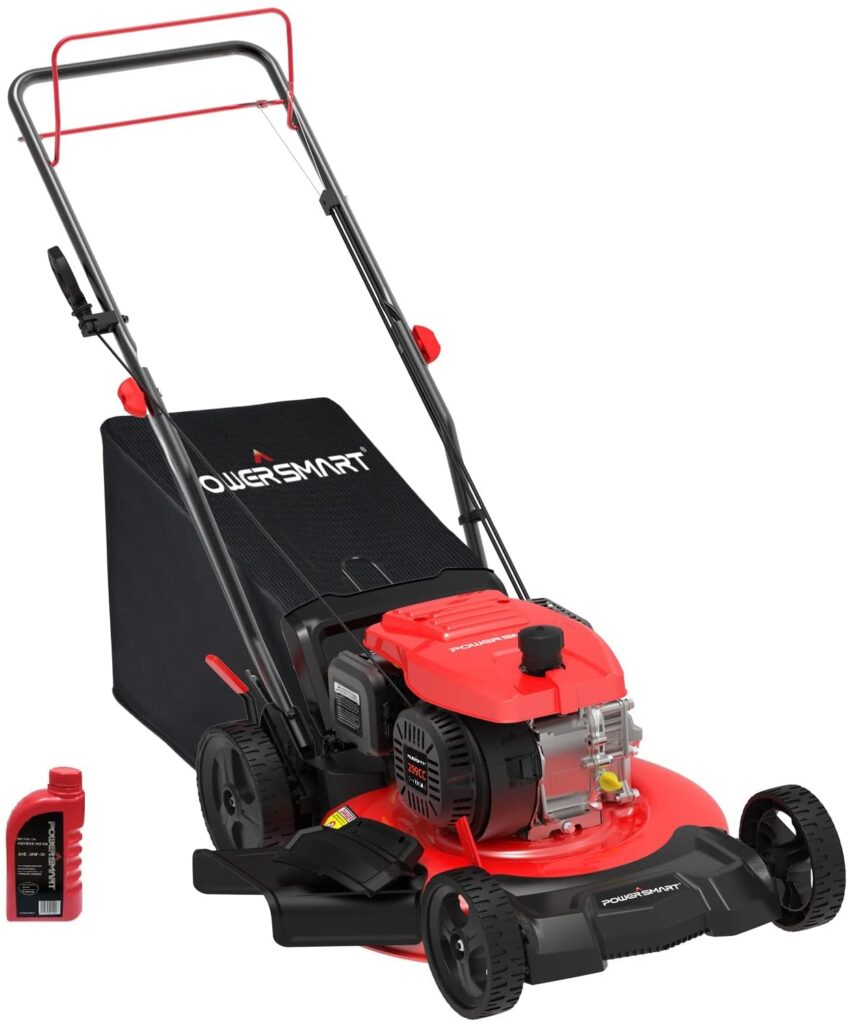
9. PowerSmart Self Propelled Lawn Mower 21 Inch 3-in-1, 209CC 4-Stroke Engine Gas Powered
PowerSmart Self Propelled Lawn Mower 21 Inch 3-in-1, 209CC 4-Stroke Engine Gas Powered
When it comes to keeping your lawn looking neat and tidy, there is no better tool than a reliable lawn mower. With its powerful engine and sharp cutting blades, a quality mower can get the job done quickly and efficiently. If you have a steep bank or hillside on your property, however, you will need a special kind of mower in order to tackle these challenging conditions. The best option for steep banks is a self-propelled mower with good traction and plenty of power. One such model that stands out from the crowd is the PowerSmart Self Propelled Lawn Mower 21 Inch 3-in-1, with its high-powered 4-stroke engine and heavy-duty wheels. Whether you are dealing with grassy slopes or rocky cliffsides, this hardworking mower has what it takes to get the job done right. So if you want an efficient way to maintain your outdoor space and keep those unruly banks under control, look no further than the PowerSmart Self Propelled Lawn Mower 21 Inch 3-in-1!
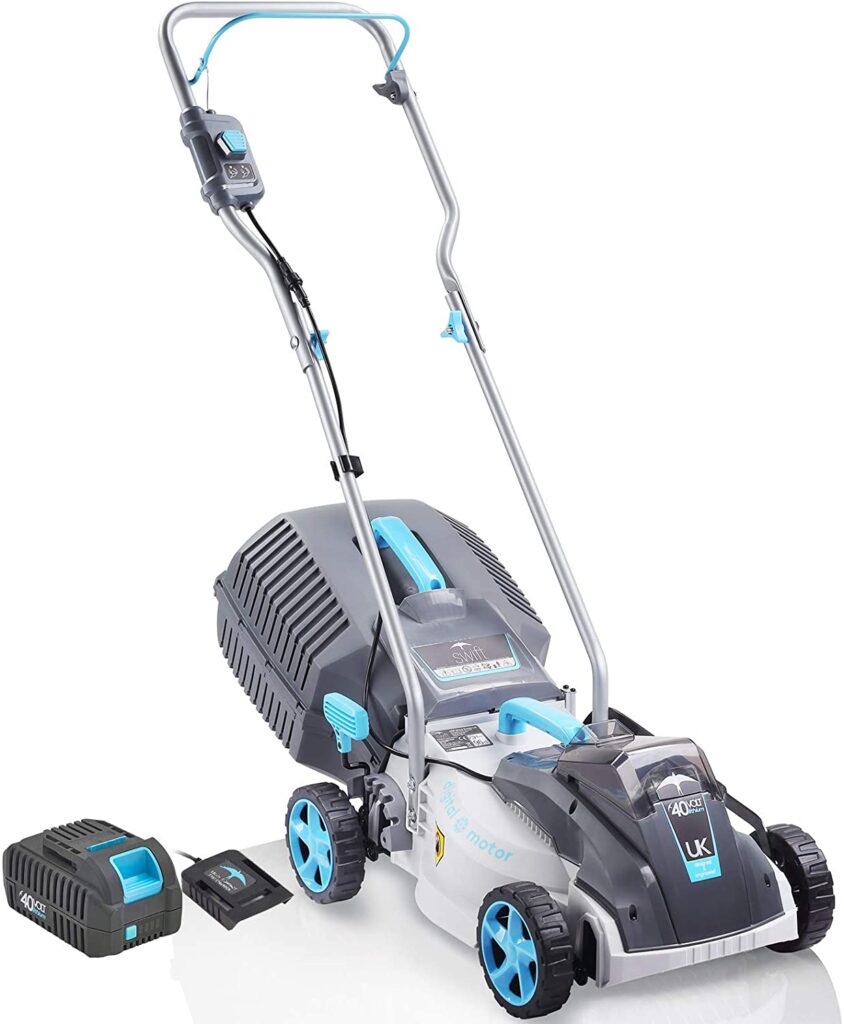
10. Cordless Lawn Mowers, 15 Inch Lightweight Lawn Mower, 40V Lithium-ion Lawnmower w/Brushless Motor
Cordless Lawn Mowers, 15 Inch Lightweight Lawn Mower, 40V Lithium-ion Lawnmower with Brushless Motor
Anyone who has tried to mow a hill knows that it can be a frustrating experience. The grass always seems to grow back twice as fast, and the mower always seems to get stuck. If you’re looking for a mower that can handle a steep bank, there are a few things you should keep in mind. First, consider a cordless model. Cordless mowers are much easier to maneuver than their gas-powered counterparts, and they’re also much quieter. Second, look for a lightweight model. A lighter mower will be easier to push up a hill, and it will also be less likely to damage the grass. Finally, consider a model with a brushless motor. A brushless motor is more efficient than a traditional gas engine, and it will provide plenty of power for tackling tough hills. With these factors in mind, you’ll be sure to find the best lawn mower for your needs.
Conclusion:
There is no one-size-fits-all answer when it comes to choosing the best lawn mower for a steep bank. However, by considering a few key factors, you can narrow down your options and find the perfect model for your needs. Cordless models are often the best choice for hillsides, as they are easier to maneuver and quieter than gas-powered mowers. Additionally, look for a lightweight model that has good traction and a powerful motor. With these factors in mind, you can be sure to find the best lawn mower for your steep bank or hillside!
Tips for maintaining your lawn mower on a steep bank:
1. Always use a lawn mower that is specifically designed for use on steep banks.
2. Keep the blades of your lawn mower sharp to ensure a clean, even cut.
3. Be sure to choose a lightweight model that is easy to maneuver.
4. Opt for a cordless model to make mowing hills much easier.
5. Look for a model with a brushless motor for added power and efficiency.
6. Be sure to follow all manufacturer’s instructions when using your lawn mower on a steep bank.
7. Regularly inspect your lawn mower for any damage or wear and tear.
8. Always store your lawn mower in a cool, dry place when not in use.
FAQs about lawn mowers for steep banks:
1. What is the best lawn mower for steep banks?
There is no definitive “best” lawn mower for steep banks, as this will depend on a number of factors, including the size and shape of your property, your budget, and the type of terrain you are dealing with. However, some important considerations when choosing a lawn mower for steep banks include power (both in terms of engine size and battery life), traction, and weight.
2. How do I choose a lawn mower for a steep bank?
When choosing a lawn mower for a steep bank, it is important to consider the size of your property, the type of terrain you are dealing with, and your budget. Additionally, keep in mind that cordless models are often easier to maneuver than gas-powered mowers, and that lighter models are less likely to damage the grass. Finally, look for a model with a brushless motor for added power and efficiency.
3. What are some tips for using a lawn mower on a steep bank?
Some tips for using a lawn mower on a steep bank include keeping the blades of your mower sharp to ensure a clean cut, choosing a lightweight model that is easy to maneuver, opting for a cordless or electric model for better traction, and following all manufacturer instructions when operating your mower. Additionally, it is important to perform regular inspections of your lawn mower to look for damage or wear and tear, and to store it in a cool, dry place when not in use.
4. How do I maintain my lawn mower on a steep bank?
There is no single best way to maintain your lawn mower on a steep bank, as this will depend on the specific model that you are using. However, some key tips to keep in mind include keeping the blades sharp and well-maintained, choosing a lightweight model with good traction, opting for a cordless or electric model, and regularly inspecting your mower for any damage. Additionally, always follow the manufacturer’s instructions when using your lawn mower on a steep bank.
5. Where can I find more information on using a lawn mower on a steep bank?
There are many resources available online that can provide more information and advice on using a lawn mower on a steep bank. Some good places to start include product reviews, professional forums or blogs, and manufacturer websites or guides. Additionally, you may want to consult with your local landscaping or gardening professionals for additional tips and insights. Whatever method you choose, be sure to do your research to ensure that you are getting the best possible advice for your specific situation.
6. Are there any safety precautions I should be aware of when using a lawn mower on a steep bank?
Yes, there are several important safety precautions that you should be aware of when using a lawn mower on a steep bank. These include keeping the blades of your mower sharp and well-maintained at all times, choosing a lightweight model that is easy to maneuver, opting for a cordless or electric model for better traction and control, and following all manufacturer instructions when operating your mower. Additionally, it is essential to perform regular inspections of your lawn mower to look for damage or wear and tear, and to store it in a cool, dry place when not in use. By taking these precautions and following any additional guidelines provided by the manufacturer, you can help ensure safe and effective use of your lawn mower on a steep bank.
7. How can I get help troubleshooting issues with my lawn mower on a steep bank?
When it comes to keeping your lawn looking neat and well-groomed, having a good lawn mower is essential. However, if you are dealing with a steep bank or other difficult terrain, mowing your lawn can be a real challenge. In these situations, having the right tools and knowledge can be key to getting the job done efficiently and without any hassles.
One of the first things you should do when trying to troubleshoot issues with your lawn mower on a steep bank is to take some time to review the instructions for setting up and using your mower. If you feel like something is not quite right when you are operating the machine, checking for any physical issues or guides for adjusting settings might be helpful. This will ensure that all aspects of your mower are functioning properly and set up correctly for tackling any kind of terrain.
Once you have taken this initial step, it is also a good idea to reach out to others for advice and guidance. You may find online forums or groups dedicated to reviewing and troubleshooting home maintenance equipment useful in identifying any potential issues that may be causing problems in operating your lawn mower on a steep bank. Whether it’s tips on how to adjust your settings
9. How can I ensure the best performance from my lawn mower on a steep bank over the long term?
When it comes to maintaining a healthy lawn, there are many different factors that you need to take into consideration. One of the most important is ensuring that your lawn mower is able to handle the steep slopes of your yard effectively. To do this, there are a few things that you should keep in mind. First, you will want to make sure that your lawn mower is equipped with high-quality tires that can handle gripping onto slippery surfaces. Additionally, it’s important to only use the appropriate settings when cutting across slopes, as well as keeping an eye out for any debris or obstructions on the ground that could cause your mower to lose traction. Overall, by taking these steps and following good safety practices, you can ensure optimal performance from your lawn mower even on steep banks over the long term.
It has been two years since we are in a pandemic that has caused health havoc across the world. As you all may remember, there was a strict lockdown imposed during 2020 to minimize the social contact among people so that COVID-19 could be stopped from spreading. It was a great idea that saved the world on many grounds. However, things are getting better now. Scientists have developed vaccines and many countries have uplifted the lockdown to a great extent. Schools, restaurants, picnic points, offices, everything is almost reopening. However, healthcare providers and researchers still urge the public to observe social distancing and wear masks since the disease has been not eliminated yet!
The greatest concern of the current time is children. This is because they are too young to be vaccinated and thus need to take greater precautions to avoid the disease contact. We’ve been receiving a lot of requests regarding guidelines for kids wearing masks. Parents are confused that whether the children should wear a mask and what type is good for them. So, here we bring you answers to your FAQs. Have a look!
Children and face masks
If your child is not fully vaccinated against COVID-19, they must wear a mask especially if they’re going out of the house for any purpose. Children who are 2 and above can safely wear masks provided that they don’t have any special health conditions. Kids under 2 years of age are not advised to wear masks because of the risk of suffocation. Also, they are very young and can’t remove masks on their own thus any mishap could be expected. Therefore, it is safe not to make them wear masks.
The ones wearing masks should wear them at schools, children’s care, camps, outdoor sports, etc. They should not only wear masks but also maintain a safe distance from their fellows. Parents are strictly said to instruct them on social distancing and see if they’re doing the needful. If you’re taking your child to a grocery store or if he/she is traveling with you publically, a mask is a must! If your child is medically fragile, we recommend you keep them home with someone who can take care of them well.
Make your child stand before the mirror and teach them properly how to wear a mask. If they are scared to wear one, make them comfortable. To serve the purpose, you can put a mask on their favorite toy animal or you can decorate their mask with their favorite cartoon or book character prints. Many companies can get you personalized masks for your children. Last but not the least, practice wearing a mask before your children so they could understand its importance. Talk about the potential risks and focus on the healthy part so your child knows about both sides of the picture.
The safest mask for children
One popular concern is which mask type is safe for the children to wear. Well, our answer to this will be WWDOLL KN95 kids masks by medicallsupllyall.com is the best for children. They are available in multiple colors and are super breathable, disposable KN95 masks for children. The size of the WWDOLL KN95 kids faces masks is ideal for all children and offers comfortable wear. Plus these masks have 5 layers of protection and thus provide 95% protection against airborne germs. If you are looking forward to buying masks for your child, get this one from medicalsupplyall.com. Trust us, you won’t regret the purchase!
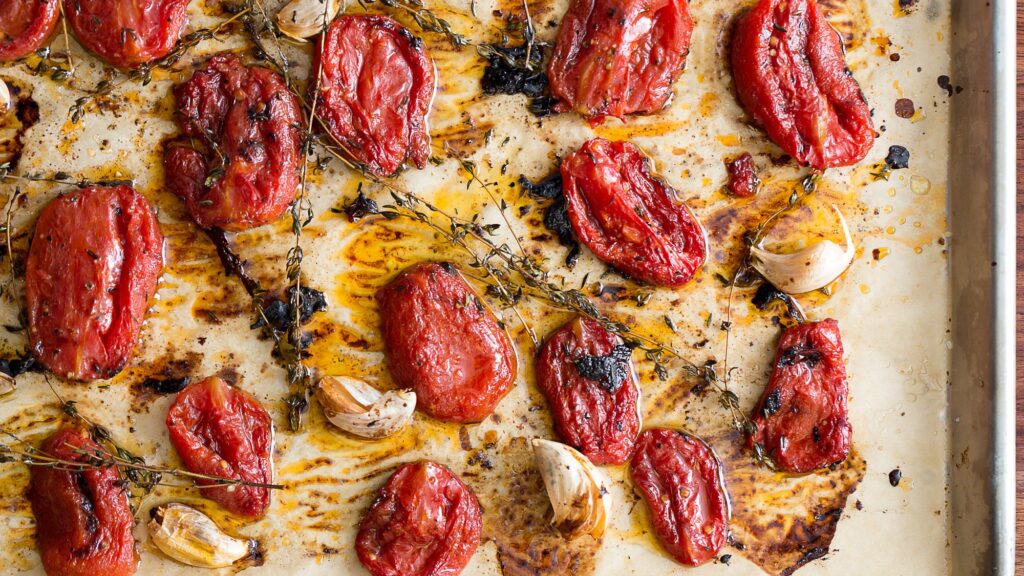
Are you planning to use that roll of parchment paper for cooking delicious meals this weekend? Wait just until you have known other creative ways to use the wonderful paper for an easy kitchen life. You certainly should not limit yourself to using parchment paper only for baking and that’s exactly what we are here to tell you more about.
Parchment paper is a flexible cooking essential that you will love to have in the kitchen. It has high heat tolerance and does not tear off while cooking which allows you to cook a variety of foods conveniently. Who does not want to enjoy a mess free kitchen life after all? Parchment Paper eases cleanup after you are done with all the cooking if you use it properly.
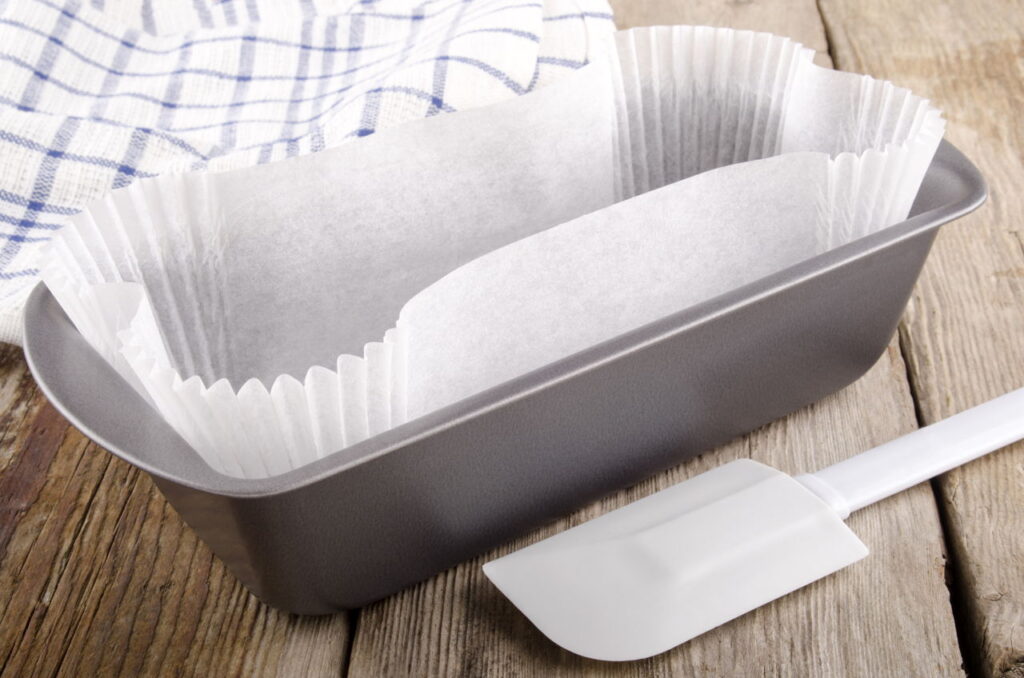
Which Side of Parchment Paper Goes Up?
Parchment paper is mostly coated with silicone on both the sides so it gets a non stick surface. So, it really does not matter which side of parchment paper goes up or down. You can use any side up and place the food to slide it off right after it has been cooked. You can literally save yourself from greasing the pans each time you bake cookies or brownies. You can still notice a shiny surface when you buy a different parchment paper which is the non stick side. Face this side up to get the best possible baking results. Also, try to use a fresh side whenever you bake using parchment paper.
How to Make a Beautiful Parchment Paper Bag?
Parchment paper is used as a paper bag for cooking food so that the steam is trapped inside. You can choose to add a variety of vegetables along with fish or chicken fillet in the paper bag and prepare a healthy meal without putting in a lot of effort. The only thing you have to do is seal the paper bag properly so that the steam does not escape. Take a piece of paper and fold it in a half. Unfold and arrange the ingredients on one side of the crease leaving space for the folds. Fold the other side to enclose your filling.
Now, it’s time to make the pleats which may seem a bit technical at first but you can easily master the technique with some practice. Start with a triangular fold at one end of the fold and keep folding triangles overlapping the previous ones. Fold and tuck the last fold under the packet so that you have a tight seal. You most probably will have a half moon shaped paper bag prepared if you start with a rectangular folded paper at first. Likewise, you can have different shapes of the bag depending on the shape and size of parchment paper you use. You may also cut the paper initially in a heart shape to form an oval shaped paper bag in the end. You are all set to put the parchment paper bag for cooking in a pan or in the oven. Make sure you follow all the safety tips for using parchment paper safely for food.
More Creative Ways to Use Parchment Paper
Parchment paper is reusable depending on what you are using it for. You may have used it for lining baking sheets and cake pans before but not for pouring ingredients into a mixer. Using parchment paper as a funnel can ease your job as you can mix the ingredients directly to the mixer. Use it as in place of muffin cup if you want to get crafty with the paper. There is a lot more that you can do with parchment paper if you want to prepare meals ahead of time. Making parchment packets is a fun activity enjoy with guests before dinner time so each of them fills their packet as they want. The packets look presentable and whiff off aroma when they are opened up at dinner. You can also use the paper for lining frozen food so it does not stick together. Think of the dish you are preparing and decide how you are going to serve it. Parchment paper can rolled into a cone to hold food items just like it is served in restaurants. Mess free cooking is usually your top priority when you buy parchment paper. Use it freely for catching drips when you are preparing or cooking food for an easy cleanup. It will save you time for presenting the dish beautifully right after it is cooked.
Is Parchment Paper Safe for Cooking?
It is reasonable to consider if parchment paper is safe for cooking or not as it still has a coating. Parchment paper that has been certified as food safe does not migrate components into the food cooked over it. The paper has no impact on the flavor or texture of your food. The bleached and unbleached parchment papers are both available for cooking food but you should still use the unbleached one. It is still better to avoid any kind of paper if you are really concerned about the chemicals you might get exposed to. Simply grease the pans with oil or butter and you are good to go. However, unbleached parchment paper can be your next option whenever you feel like using it.
Are there any other alternatives for parchment paper?
You might have heard a lot about using wax paper, aluminum foil, and silpat paper as a substitute for parchment paper. All papers have varying properties and you can use them depending on what you are going to cook in it. Wax paper is certainly not going to be choice for baking as it will not work in a hot oven. Aluminum foil can withstand heat in the oven but does not have non stick effect. Silpat paper, on the other hand has more properties in similar with parchment paper but will also cost you more. So, you have to choose your paper according to your personal preference keeping all factors in mind. Using different papers on different occasions can work only if you are aware of how to use each of them safely.
How Does Parchment Paper Make All the Difference?
You’ve probably tried baking or roasting fish in the oven along with a variety of vegetables you like and ended up having them stick onto the oven tray. Baking fish is certainly the right thing you are doing to save all its nutrients but now it’s time to use parchment paper for baking fish the right way. Baked fish retains Omega 3 fatty acids and Vitamin D more than the fish prepared with other cooking methods.
This article will further explain how to fold parchment for fish so you are saved from all the hassle of cleaning up dishes after baking. Folded parchment paper is used as a cooking bag for fish to hold in moisture and retain the tenderness of your food. It is easy to create a neatly folded parchment paper bag for preparing flavorful food on a special dinner. The packet retains all the moisture inside to produce a quick and delicious meal for you to enjoy whatever you crave in a few minutes.
The folding technique is not difficult as it seems but it will certainly need some practice. Make sure you seal the packet strong enough to stay shut and hold all your spices in while cooking. This basically requires pleating each parchment paper individually in a way to close all edges around the food placed over it. Whether it is chicken or a fish fillet you want to bake, you may also add vegetables along with the proteins to prepare the healthiest meal. Go step by step in order to master the paper parchment folding technique and prepare food packed with tons of flavor without putting in much effort.
Open the Parcel Properly
Opening the parcel is just as important as folding it properly to enjoy all what you have locked in inside. Try to be careful as you make a long cut using sharp kitchen shears to open up the edges. The steam will disperse as you open up along the edges and your presentation stays in place.
How to Fold Parchment Paper for Fish?
The size of parchment paper required depends on what you would like to put in the prepared paper bag. It is better to start with a parchment paper that is at least 15 inches wide and 17 inches long. Folding the paper half will give you an idea of where to place food. You should leave 1 inch space to the left of fold to keep the fillet in center of the pouch you are going to fold. Put whatever seasoning and spices you like over the fillet along with any vegetables you want and get ready to lock everything inside the pouch you are going to prepare. The folding technique should no longer haunt you now as you get an easy way of doing it. Beat an egg and then get a pastry brush in hand to brush it around the three edges of parchment paper. This will seal the piquancy of food you are preparing and ease your cooking life. Now fold the paper to cover whatever filling is inside the packet. This folded packet will look like a simple rectangular wrap but you cannot stop over here as there is more folding to be done ahead. More folds are needed to keep the packet shut until the fillet and ingredients are fully cooked.
Don’t panic as we have the easy folding method for you to start with. Make a triangular fold starting at one end of the packet and push it down. Make another fold overlapping the previously made triangular fold half way through. Continue making pleats along the side you started with. Basically, you are working around the edges of food to lock the food inside. You can make larger pleats as you move along the long side of the packet and shorter ones as you get closer to the end. Make the last fold and tuck it under the half moon shaped packet very tightly. And you are all set to place the prepared parchment paper packet onto the baking sheet.
There is another way of folding up the parchment paper that requires a bit of cutting and folding. Fold the paper in half and cut it into a heart shape. Now start making folds using the same technique explained above. This method might end up in a smaller parchment paper bag as you had initially cut the paper into a heart but both serve the same purpose and are super easy to seal your food tightly within.
Why Should You Use Parchment Paper?
You do not need to add any fats or oils when you prepare the food wrapped up in a parchment paper. This is exactly what makes you want to use it. The variety of vegetables to cook in parchment paper pouches is truly endless but you need to be really careful while slicing them so they are cooked quickly. Baking fish in a parchment paper does not allow it to stick onto the oven tray. Moreover, it is super easy and tasty way to prepare flavorful meals ahead of time without any mess.
What Else to Add onto the Parchment Paper?
The options for having parchment wrapped dinners are endless if you are a seasoned cook who also hates dishes. You certainly do not need to add a lot of ingredients when you are using parchment paper for fish or chicken. Toss a few spices and sauces over the fillet placed on the parchment paper and lock in the piquant flavors by folding the parcels properly. Choose spring vegetables, baked potatoes, zucchini, spaghetti, mushrooms, rice, spinach, or eggs to complement fish or chicken fillet. The dish has an amazing look to impress your guests with the effortless presentation. Parchment paper is non stick and perfect for use as a baking tray liner, muffin cup liner, snack cones, baked goods wraps, and layering goods for storage. So, you are just not limited to using parchment paper for baking in the oven as you have plenty other ways to light up your creativity.
How to Cook Fish in Parchment Paper
What Makes Parchment Paper Safe for Cooking?
What comes to your mind first when you think of using parchment paper for cooking purpose? Is it food safety that you are concerned most about or the flavor and texture of food you cook with it? Here we are going to discuss some of the reasons why parchment paper is worth having in your kitchen.
Parchment paper is treated with sulfuric acid to make it greaseproof and heat resistant. Non stick properties can also be achieved by coating the paper with silicone on both sides so you don’t have to worry about which side of the paper goes up. Although parchment paper is more widely used for baking, you can still use it safely for wrapping cakes, sifting flour, coating food, cupcake liners, folding cooking pouches, and even steaming food.
Is it Good for Non toxic Baking?
Looking ahead to lead a healthier and toxin free lifestyle may direct your concern on cookware as the cooking surface may leach chemicals into food. While small amounts of chemicals may not pose a major health risk, it may still put you in doubt. It is therefore best to use safest pans for cooking and baking to minimize any hidden dangers. Even the non stick pans have a potential toxic coating which releases harmful chemicals when heated. The pans wear down with time and the non stick layer begins to scratch off which ends up sticking on to the food you cook in it. You are most likely to face this issue with all bake ware which is why you should be looking for non toxic alternatives. Does that mean parchment paper is a good alternative for safe baking? Yes, you got that right.
Is it Good for Non toxic Baking
You may use parchment paper as a disposable non stick surface for baking purpose so you do not have to struggle with oiling bake ware pans. Now, you may still have a concern while you put your food onto the parchment paper for cooking as the paper has a coating. The unbleached parchment paper is untreated which makes it an ideal option for you to use. However, bleached parchment paper contains toxic dioxins so it is safer to use the unbleached parchment paper for cooking. The unbleached parchment paper is a bit more expensive when compared with the bleached paper but it is still worth using for all your cooking needs. Make sure the paper does not come in contact with heating element of the cooking medium you choose.
Safety Tips for Using Parchment Paper in Oven
Parchment paper has unique properties but should not come in direct contact with any heating element that can catch fire. Parchment paper is still a paper which should also not be exposed directly to a flame. It is certain that the paper is not flame retardant which is why you need to be extremely careful while putting it in the oven. Although the paper withstands high heat up to 450F, it can burn very well if it heated above the recommended temperature. Trim the excess edges of paper to avoid igniting it in the oven.
Take care of the parchment paper size when you are using it in the electric oven. The paper should not touch the heating element or else it may not handle the temperature which is too high.
Try not to use the same parchment paper more than three times as it may disintegrate and affect your food badly. Also, dispose of the previously smoked paper pieces as they may ruin your food.
Is Parchment Paper Safe for Microwave Oven?
Microwave oven is commonly used for reheating leftovers and preparing instant food. Parchment paper can be used for cooking food in packets while you should also prevent overheating food. Also, be careful about wrapping up food tightly with the parchment paper folded around so it does not get blown away.
Can we Use Parchment Paper in the Toaster Oven?
Toaster ovens are smaller in size than the electric ones and you should be more careful when using parchment paper for cooking food in it. The paper might touch the walls of the oven if you do not trim it properly. You can still wrap up your food items in parchment paper pouches to cook them on the cooking tray.
Ever Thought About Using Parchment Paper in Air Fryers
The use of parchment paper in air fryers is more common than you have thought. The paper should however be tucked into the basket properly to ensure that it does not pose fire hazard. It is better to use perforated parchment paper so that the heat circulates properly.
Is Parchment Paper Safer than Other Materials
Parchment paper may get a bit dark in color when you use it for baking but it does not catch fire even if exposed to prolonged heat. The superior properties of parchment paper make it safe and suitable for cooking whatever you like. You should always know about alternatives to use in place of parchment paper if you do not have it. Wax paper, aluminum foil, and silpat paper can be used as substitutes depending on how you want to cook your food as these do not provide all properties of parchment paper.
Wax paper provides a great non stick surface but cannot be used for baking as it does not resist high heat. It can however be used as a cheap alternative of parchment paper where heat is not required. Likewise, aluminum can be used as a replacement for parchment paper but it does not have non stick characteristics. You can still use aluminum foil as a liner for plating desserts and steaming veggies. The silpat paper is somehow very similar to parchment paper and can be used as its replacement. It may cost you more than parchment paper but it works as a baking mat and is more durable. Moreover, the silpat paper can be used a thousand times after cleaning it up with a solution and water.
REUSE OF PARCHMENT PAPERS; A SECRET TO CRISPY DELIGHTS!
It rests perfectly in your baking tray, waiting there to turn your batter in a golden crispy mountain of tastefulness that could sooth your taste buds. Sometimes you would use it to the extent that you run out of it at the time you need it the most. What would you do then, as no baking recipe is complete without it? Just a simple thing yet totally unignorable; this is parchment paper.
Parchment papers have been around since the early modern baking. It evolved with the time, just like the baking techniques, till it became such an important essential for it that no one can imagine baking without it. Reuse of Parchment papers are multifunction grease proof and heat resistant papers that could be used to not only bake things, even in ovens, but they could also be used as wrapping papers for food to save it from dust and to let it remain fresh.
These papers, also called baking papers, save you from messy and untidy utensils as you are not cooking directly on the baking tray itself, but on the paper. Moreover, you don’t need to apply extra ounces of grease or butter on the base of your cooking pan to prevent sticking of your batter with it. Just put the batter on the paper and let the magic begin.
HIGH RESISTANCE
Parchment papers usually come with a layer of silicone and have a high resistance to high temperatures. These papers are amazingly resistant to high temperatures and can tolerate up to 450 Degree Fahrenheit.
SUBSTITUTE TO PARCHMENT PAPER, IS THERE ANY OPTION?
There are several alternative options available when you get short of parchment papers, but none of them come up to its mark. The most widely used are wax papers and aluminum foil, but both have their pros and cons. In a situation when you need to bake your cookies, cakes or anything else, and you can’t seem to find a parchment paper, both of these could prove helpful. But a problem that might irritate you would be extra amount of waxing on the baking tray, and paying extra care to prevent burning of wax paper from overheating. Moreover, foil sheets could get overheated and could cause some serious burns if not handled properly. Aluminum foils are non-stick as well, so there is always a fear of food sticking to the base of your pans.
USEFULNESS
Reuse of Parchment papers are extremely helpful when it comes to fast and handy cooking. You can cut them in any shape and any size, and it is good to go.
MORE USES, MORE BENEFIT
As you can use it the way you like, reuse of parchment papers have become a top choice for home chefs who are always ready to cook something. Most of the times, it would not be limited to the baking alone, and is used for tons of other purposes. This extreme all-round helpfulness makes is more beneficial for everyday use and for use outside the home, either when you are having a burger or a hotdog, or you are enjoying your sandwich. Parchment paper will save your food retaining the original crisp of it, till it reaches your mouth.
What can I use instead of parchment paper?
Parchment paper is a cellulose-based paper that is being coated to make it non-sticky. It is utilized in preparing as an expendable non-stick surface. It ought to not be befuddled with wax paper or waxed paper, which is paper that has been coated in wax. It is commonly used in baking and cooking as it is heat resistant and makes the surface non-stick. If the parchment paper is not available, then there are many other substitutes for parchment paper. A few of them are listed below with an explanation.
Substitute for Parchment Paper
The most common substitutes for parchment paper are:
Wax Paper
Paper bag
Silicone baking mat
Aluminum Paper
Silpat Paper
Cooking spray
Wax Paper
Wax paper is used for storing, wrapping, or presenting food. Waxed paper can be a great substitution for parchment paper in case your reason for utilizing does not have things to do with high heat. Because it has low-melting-point there for it is not good for baking. For example, if you are baking a cake then there is a chance that chocolate may melt. Wax paper, however, can be an awesome substitute for parchment paper. it can be much supportive to roll out the mixture, lining the heating container, making a no-bake cake, beating meat into cutlets, layering a few things, clean, and many more.
Paper bag
Since the parchment paper is used for cooking, baking, and wrapping food so the paper bag can be used as a substitute for parchment paper. Paper bag is good for wrapping food. Utilizing the paper bag will be an incredible thought if your reason is to wrap anything. Don’t utilize it for cooking or baking since it includes exceptionally low burning temperature. The use of the paper bag for wrapping kitchen items is now becoming trendy and environment friendly.
Silicone Baking Mat
Silicone baking mat is commonly known as Silpat within the market. It could be a well-known choice among the family units and commercials bakers since of its longevity and reusability. You can reuse this mat repeatedly within the future for different purposes. Whether you employ it for cooking or preparing, you cannot go off-base with this choice. Since it is made of silicone, it gives a non-stick surface.
Aluminum Paper
Aluminum foil may be an awesome elective since it is reasonable, adaptable, as well as reliable. It performs much better heat transfer. The adaptability of the aluminum foil permits the clients to lift the food and release them without any bother. You’ll be able to do fast cleaning much obliged to the adaptable character of the foil.
Silpat Paper
Silpat paper is additionally called the baking mat. As the title recommends, it works for the heating strategy. This mat is more exorbitant than material paper. Made of silicone, it is more solid and keeps going longer than the parchment paper. Hence, it is also a good substitute for parchment paper.
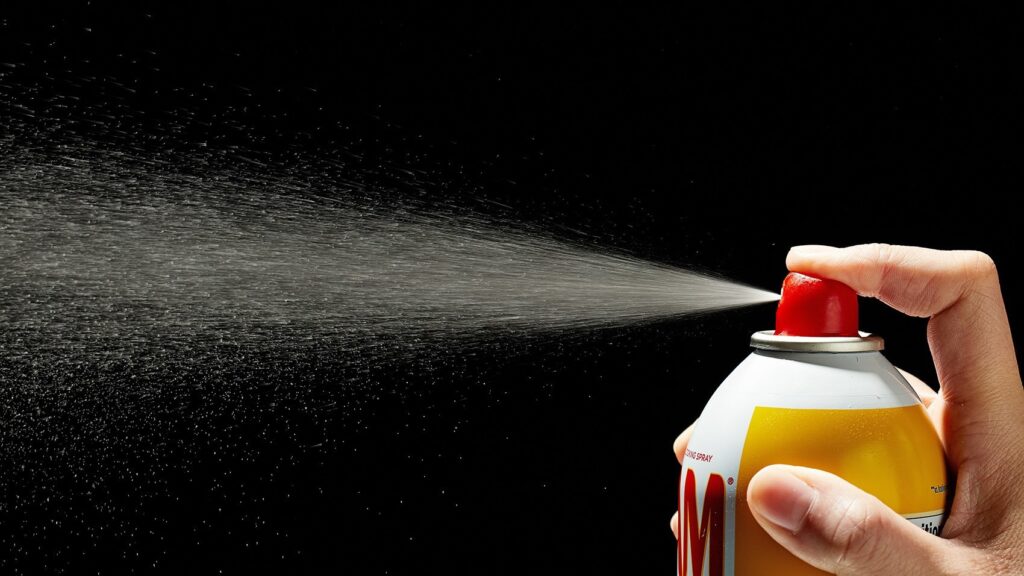
Cooking spray – the routine way of non-stick pan
If you cannot decide on any of the above options, you can utilize cooking spray. The cooking spray can be a great coat that avoids your fixings from staying in your dish or molds. So, don’t feel blameworthy to utilize cooking spray once you are running out of parchment paper.
Thus, all the options provided above are the best substitute for parchment paper. If you run out of parchment paper feel free to use those amazing options.
Are you thinking to hang blackout curtains but afraid of wall damage or drilling? Hanging out curtains is for sure a big problem as it includes dragging the ladder, measurements, and calculations. If you are tired of these traditional methods then you are at the right place. In the next few lines, we are going to provide you the amazing methods to hang blackout curtains without drilling.
Ideas to hang blackout curtains without wall damage
Here are the ways to hang blackout curtains:
By Using 3M Command Hooks
By Using Tension Rods
By Using Magnetic Curtain Rods
By Using Twist And Fit
By Using Coat Hooks
By Using 3M Command Hooks
One of the easiest ways to hang blackout curtains is to use command hooks. The procedure is simple. What you need to do is:
Find the distance or measure the wall where you are planning to hang blackout curtains.
After you are done with measurements next step is to peel off the command strip adhesive and apply that stick to the hooks.
Now stick the hook to the wall or point (you noted in the previous step) for almost 30 seconds.
Wait for at least half-hour and then hang the blackout curtains.
Command hooks are available in a variety of sizes and finishes.
By Using Tension Rods
Tension rods usage in hanging blackout curtains is one of the finest ways you ever came across. They are easy to install and make your curtain hanging possible in minutes. Tension rods stretch from one side of the window to the other and they are adjustable too. There are few easy steps to follow:
Select the tension rod closet to your window size.
Now fit the tension rod in your window frame.
Take out the rod back to thread the blackout curtain onto the rod. After threading the curtain place this rod back to the window frame.
By Using Magnetic Curtain Rods
If you are planning to hang blackout curtains on a metal window or door then magnetic curtain rods are the best choice. The blackout curtains will stick to the metal and will not even fall when the door is opened or closed.
Thread the curtain on the rod and then place the rod on the metal surface. The rod will automatically stick to the metal without drilling.
These magnetic curtain rods are the easiest to install and are also available in adjustable widths.
By Using Twist And Fit
Twist and fit are also another and decorative solution to hang blackout curtains without drilling. They are similar to tension rods but the difference is that the ends of them are decorative and stylish. They stick out from the wall and allows the blackout curtains to sit in front of the window.
By Using Coat Hooks
Coat Hooks can be used for a variety of purposes like hanging bags, raincoats, and blackout curtains. The steps to follow are:
Find the number of hooks you need to hang your blackout curtains.
Next step is to select the height of the hooks according to your curtain length. Note if the size of the curtain is small the coat hooks provide you the ease of adjusting the size by varying the height of hooks.
Select the distance between the hooks by marking the points for even distribution.
Now stick the coat hooks either on the rod already attached or to the wall.